
Spa Experience
Who doesn’t love a good facial? There’s something so relaxing and rejuvenating about lying back while a professional esthetician massages and treats your skin. But what if you could recreate that spa experience in your own bathroom? With a few simple steps and DIY techniques, you can turn your bathroom into a spa and enjoy a luxurious at-home facial. In this blog post, we’ll explore how to create a spa experience in your own bathroom with a DIY at-home facial.
Step 1: Set the Mood
Before you begin your at-home facial, you want to create a relaxing atmosphere. Light some candles, play some soothing music, and dim the lights to create a calming ambiance. Make sure your bathroom is clean and tidy, and consider adding some fresh flowers or plants to enhance the spa-like feel.
Step 2: Cleanse Your Skin
Start your at-home facial by cleansing your skin. Choose a gentle cleanser that is suitable for your skin type, and massage it into your face and neck using circular motions. Rinse your face with warm water and pat dry with a soft towel.
Step 3: Exfoliate Your Skin
Next, it’s time to exfoliate your skin to remove dead skin cells and reveal smoother, brighter skin. You can either use a gentle scrub or a chemical exfoliant, such as a glycolic acid or lactic acid peel. Apply the exfoliant to your face and neck, avoiding the eye area, and let it sit for a few minutes before rinsing off with warm water.
Step 4: Steam Your Face
Steaming your face is a great way to open up your pores and prepare your skin for the next steps of your at-home facial. You can either use a facial steamer or simply boil some water, pour it into a bowl, and place your face over the bowl while covering your head with a towel. Do this for five to ten minutes, and then pat your face dry with a soft towel.
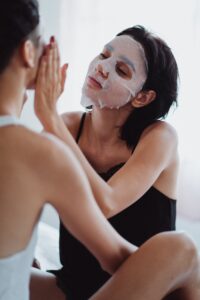
Step 5: Apply a Face Mask
Now it’s time to apply a face mask to your skin. There are many different types of face masks available, from hydrating masks to clay masks, so choose one that suits your skin type and concerns. Apply the mask to your face and neck, avoiding the eye area, and leave it on for the recommended amount of time before rinsing it off with warm water.
Step 6: Massage Your Face
After you’ve rinsed off your face mask, it’s time to give yourself a facial massage. Use your fingertips to gently massage your face and neck in circular motions, starting at your forehead and working your way down to your chin. This will help to stimulate circulation, reduce puffiness, and promote relaxation.
Step 7: Apply a Serum and Moisturizer
To finish off your at-home facial, apply a serum and moisturizer to your skin. Choose a serum that targets your specific skin concerns, such as brightening or anti-aging, and apply it to your face and neck. Follow up with a moisturizer to lock in hydration and leave your skin feeling soft and supple.
DIY At-Home Facial Skincare Tips
- Choose skincare products that are suitable for your skin type and concerns. If you have oily skin, look for products that are lightweight and non-comedogenic. If you have dry skin, look for products that are hydrating and nourishing.
- Always use warm water when cleansing your skin, as hot water can strip your skin of its natural oils and cause irritation.
- Be gentle when exfoliating your skin, and only do it once or twice a week to avoid over-exfoliation.
- When applying a face mask, make sure to avoid the eye area and leave it on for the recommended amount of time to avoid irritation.
- Don’t forget to apply sunscreen after your at-home facial, even if you’re not going outside. Sun protection is essential for maintaining healthy skin and preventing premature aging.
- Drink plenty of water before and after your at-home facial to keep your skin hydrated and plump.
- Don’t forget to take your time and enjoy the process. A DIY at-home facial is a great opportunity to relax and pamper yourself, so take advantage of it!
In conclusion, creating a spa experience in your own bathroom is easier than you might think. With a few simple steps and some DIY techniques, you can enjoy a luxurious at-home facial that will leave your skin looking and feeling refreshed and rejuvenated. Remember to choose products that are suitable for your skin type and concerns, take your time, and enjoy the process. With these tips, you’ll be on your way to a spa-worthy at-home facial in no time!