
Follow These Simple Steps for a Perfect Blowout Every Time
Salon-quality blowouts are possible from the comfort of your home, and the key is organization. Collect all of your materials on the counter or sink before you start—just like chefs do with their mise en place.
This method works in salons for a reason: it keeps things tidy and makes beautiful blow-drys easier to achieve.
The Best Blowout in Only a Few Easy Steps
1
Before you even get your hair wet, it’s important to lay out all of your blow-drying tools. The most crucial tool is a high-quality hair dryer. A lot of people think that the product you use is the key element in how good your blow-dry looks, but really, it’s all about the dryer.
The ideal dryer greatly reduces drying time and energy consumption with its 80-mile-per hour motor and eight heat, speed, and ion settings. You can tailor any blowout to your hair type and desired style with the help of a cold shot button.
Additionally, it has a dual filtration system that makes using the dryer much easier by nearly eliminating cord wrap issues.
2
Before blow-drying your hair, first gather a paddle brush for detangling and a round brush for styling. Both brushes are necessary regardless of your hair type: the round brush will give you volume if you have fine hair, or it can help make curly hair smoother.
Detangle each section of wet hair with the paddle brush before moving on to the next step of blow-drying.
3
Having clips on hand is also important for keeping your hair out of the way while you dry it.
4
All styling products need a place, too. Regardless of whether you like creams, oils, or mousse better, if you’re somebody who loves styling products, have them close to everything else product-wise.
5
After you’ve gathered your materials, take a shower. A silkifying pre-shampoo treatment will help tame frizz and flyaways; leave it in for 20 minutes, then wash your hair like normal.
Be sure to shampoo and condition your hair. If you find that your locks tend to frizz, try combing them out in the shower while you still have conditioner in your hair – it can make a noticeable difference. This wonderful whipped shampoo acts both as a purifier and detoxifier.
This spray not only tames flyaways, but it also protects your hair from heat damage. As a result, you’ll experience silkiness and shine like never before!
6
The amount of towel-drying you do should be based on your hair type. Many people damage their hair by rubbing it harshly with a regular towel—this causes frizz even if your hair texture isn’t already prone to frizziness.
If you have very tight curls, you’ll want to blow-dry your wet hair. Otherwise, put it up in a moisture-wicking turban made from a smooth, fast-drying towel.
7
If your hair is wet, now is the time to comb or brush it out.

How to Achieve a Perfect Blowout at Home
If you want to learn how to blow-dry your own hair perfectly, try this trick: do it on someone else first. Just once will be enough to show you what you need to know so that you can replicate the process on yourself.
It may sound counterintuitive, but blowing-dry another person’s hair is the best way to guarantee perfect results each and every time for your own hairstyle.
If you have fine hair, go for a dryer with a wider mouth on the attachment. This will give your locks more volume. On the other hand, if you have thick and curly hair, get the narrowest attachment to ensure that air is focused where it’s needed most.
Clear brow gel is a lifesaver for flyaways on the top of your head at the end of a blow-dry. I use it all the time, and it works like magic!
8. Select your role in the style. It might not seem crucial, but focusing on making your part intentional will reflect positively on the entire look.
9. Clip up your hair sections by dividing them into four parts to start—two in the front, two in the back. If you have a lot of hair, then you’ll need more sections. When blow-drying each section, make sure they’re no wider than an inch.
10. Always start with the hardest tasks first—in this case, at the lower back of your head. Doing so will help you maintain focus and not get burned out before finishing. If you do the easier pieces in the front first, it’ll be more difficult to parse through once you reach the back. Being detailed is why a salon blowout looks amazing and lasts much longer than if done by oneself.
11. Finally, use your paddle brush to detangle the section.
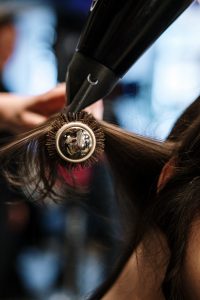
12. Start by holding your brush close to your head and catching the hair in the section. Slowly pull the brush through the section, catching as much hair as you can, Then point the dryer at the pulled-taut section of hair with the nozzle down and turn it on, holding it close but not letting it touch your hair.
Move slowly following the same path that you used with the brush, making sure each strand is dry before moving on.
13. Once you reach the end of your hair, move the dryer around the brush to dry it completely. Once that’s done, blast the ends (still wrapped around the brush) with cold air. A good blast of Arctic air will help it last longer.
14. Start with the lowest section of hair in the back, and repeat the process until you reach the top of the back. Then, do the lower sides, and then finish with the upper sides.
15. You are now prepared for the “mohawk”: For the final section, you will do everything opposite of what you have been doing: Dry it toward your face. Going in the ‘unexpected’ direction provides a small lift right where it appears best.
16. Use the round brush and dryer on sections of hair around your face for one last time. Remember to use the “cool shot” setting on your blow dryer to help keep the curl in place.
17. If you want gleaming, silky hair, there are a few easy ways to get it, no matter your hair type. If you’re going for shine, take a tiny amount of oil or hair cream and smooth it into the thinnest layer between your palms.
Gently twist it through your ends just once or twice. Be careful not to use too much product; you don’t want blobs of stuff in your locks! You can also revive a blowout by spritzing sections of dampened hair with water.