
Check out Gua Sha for amazing at-home results
I am not the only one whose skin has turned into a scallion pancake overnight; many of my friends are in the same boat. My broken-out, teen-like complexion is stress-induced, which is nothing new to me; there have been numerous studies linking psychological stress to problematic skin conditions.
Despite being grateful for continued employment during these times, I cannot help but feel an overwhelming sense of anxiety that follows me throughout each day.
When my skin is acting up, I go to a beauty studio for a guasha facial. My skin looks and feels noticeably better afterward—calmer breakouts and an intense glow that lasts for days. Since visiting the studio isn’t an option right now, in order to achieve my best skin, I am going to try an at-home gua sha facial every morning.
Derived from ancient Chinese practices, gua sha uses a shaped tool to invigorate and cleanse the skin, as well as support lymphatic drainage. The process of gently moving the gua sha stone over my face feels amazing—it’s like a deep tissue massage that instantly makes my skin look smoother and more defined.
After continuing this treatment for around a week, I began to see gradual changes in my complexion; it became calmer and clearer, with an overall healthier appearance. Not only do I love the results that Guash brings about on my skin, but I also simply enjoy the sensation of using the cool stone on my face every morning.
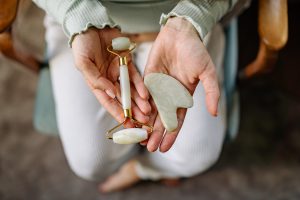
I start my day by spraying on a skin tonic composed of aloe and lavender. Then, I smoothed in a face oil with nourishing organic rosehip oil. Afterwards, I grab the gua sha stone—it’s made out of rose quartz, which is both sustainable and beautiful.
My “gua sha whisperer” and holistic aesthetician gently dragged the stone over my face. By doing this, I am helping to remove any unwanted stagnancy in the skin—much like one would during a standard facial with extractions. Over time and with regularity, this can help reduce blemishes.
Although, it’s important not to use the technique over active breakouts but rather work around them. An added benefit is that it leaves your skin looking more sculpted and contoured instantly.
Gua sha is beneficial for all skin types, and its low-tech qualities make it easy to use. First, apply the tonic and face oil, then hold the stone at a forty-five degree angle and glide it upwards against gravity for a lifting effect.

4 Different Types of Gua Sha Face Massages
1 – Lift Your Face
Use the comb edge to smooth the stone from the jawbone, up over the cheekbone, and then diagonally up past the temple. Repeat on each side. It feels great to remove all that muscular tension—as if you just put down something heavy. By stimulating circulation in these muscles, you are toning them and keeping them healthy and firm; it’s like a small mini facelift that only lasts temporarily.
2 – Depuff Your Face
Gently glide the stone along your jawline with the U-shaped edge from your chin out and up to your ear five times. Afterwards, with light pressure while still using the U-edge, trace the stone from your earlobe down to your collarbone; do that process five times as well. You’re ridding yourself of any negative energy by sweeping it all from the face outwards towards ears and then finally down at the collarbone area. Repeat on each side until you’ve completed both sides.
3 – Smooth Skin
This stone can be used on any facial area you want to temporarily smooth out, such as crow’s feet, nasolabial lines, or the forehead. To use it, find the area you want to target in a mirror and hold the skin there taut with two fingers. Next, trace perpendicular back-and-forth motions over that area with the comb edge of the stone—as if you were erasing something with a pencil eraser. Be sure to apply only light pressure so that you don’t leave marks behind.
4 – Awake Your Eyes
Use the flat edge of the stone to lightly go over your brows from the innermost part towards your hairline. The flat edge is perfect for delicate areas on your face, and in this instance, you want to follow along the orbital bone to give a little lift to that area around your eyes.