DIY Hair Treatments and Tips

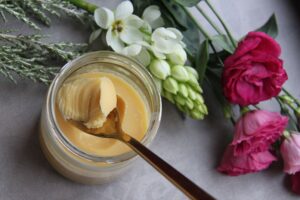
In the pursuit of luscious, healthy locks, few ingredients rival the natural richness of shea butter. Hailing from the African shea tree, this golden-hued butter has been cherished for centuries for its moisturizing and nourishing properties. In this beauty blog, we unlock the secrets of shea butter for your crowning glory, exploring DIY hair treatments and tips that promise to transform your mane into a luxurious masterpiece.
Understanding the Magic of Shea Butter for Hair
- Intense Moisture Lock: Shea butter is renowned for its ability to deeply moisturize the hair shaft, making it an ideal ingredient for dry and damaged hair. It forms a protective barrier, preventing moisture loss and leaving your locks soft and supple.
- Rich in Nutrients: Packed with vitamins A and E, shea butter provides essential nutrients that promote overall hair health. These vitamins contribute to a healthy scalp, nourish hair follicles, and support the growth of strong, vibrant strands.
- Natural Emollient: Shea butter acts as a natural emollient, smoothing the hair cuticle and reducing frizz. This makes it a valuable ingredient for taming unruly hair and promoting a sleek, polished appearance.
- Scalp Soothing Properties: The soothing and anti-inflammatory properties of shea butter make it beneficial for the scalp. It can alleviate dryness, itchiness, and irritation, fostering a healthy environment for hair growth.
DIY Shea Butter Hair Treatments for a Regal Mane
- Shea Butter Hair Mask for Deep Hydration:Ingredients:
- 2 tablespoons shea butter
- 1 tablespoon coconut oil
- 1 teaspoon honey
Instructions:
- Melt the shea butter and coconut oil together in a double boiler.
- Once melted, add honey and mix thoroughly.
- Apply the warm mixture to damp hair, focusing on the lengths and ends.
- Cover your hair with a shower cap and leave the mask on for 30 minutes.
- Rinse thoroughly and shampoo as usual.
Benefits: This deeply hydrating mask combines the moisturizing properties of shea butter with the nourishing benefits of coconut oil and honey, leaving your hair silky and revitalized.
- Shea Butter and Aloe Vera Scalp Treatment:Ingredients:
- 3 tablespoons shea butter
- 2 tablespoons aloe vera gel
- 1 teaspoon jojoba oil
Instructions:
- Whip the shea butter until creamy.
- Add aloe vera gel and jojoba oil, mixing well.
- Section your hair and apply the treatment to your scalp, massaging gently.
- Leave it on for 20-30 minutes.
- Rinse thoroughly and shampoo as usual.
Benefits: This soothing scalp treatment harnesses the anti-inflammatory properties of shea butter and aloe vera, providing relief to a dry or irritated scalp while promoting a healthy environment for hair growth.
- Shea Butter and Argan Oil Split-End Repair Balm:Ingredients:
- 2 tablespoons shea butter
- 1 tablespoon argan oil
- 5 drops lavender essential oil
Instructions:
- Melt the shea butter in a double boiler.
- Once melted, add argan oil and lavender essential oil, stirring well.
- Allow the mixture to cool and solidify.
- Apply a small amount to the ends of your hair to target split ends.
Benefits: This repairing balm combines the nourishing properties of shea butter and argan oil to hydrate and seal split ends, while lavender essential oil adds a delightful fragrance.
Tips for Incorporating Shea Butter
- Choose Unrefined Shea Butter: Opt for unrefined shea butter to ensure that it retains its natural nutrients. Unrefined shea butter is minimally processed, making it more potent in its moisturizing and nourishing capabilities.
- Warm Before Applying: Shea butter has a high melting point, so warm it in your hands or melt it slightly before application to make it easier to distribute evenly through your hair.
- Focus on Ends and Dry Areas: Concentrate on applying shea butter to the ends of your hair and areas prone to dryness. This helps target split ends and provides extra hydration where it’s needed most.
- Use as a Styling Aid: Shea butter can double as a styling aid for those with curly or frizzy hair. Apply a small amount to damp hair before styling to enhance definition and reduce frizz.
- Incorporate into Your Night Routine: For an overnight treatment, apply shea butter to your hair before bedtime, covering it with a silk or satin scarf. This allows the shea butter to work its magic while you sleep, leaving you with nourished locks in the morning.

Shea Butter Hair Myths Busted
1. Myth: Shea Butter Makes Hair Greasy
Fact: When used in moderation and applied correctly, shea butter provides deep hydration without leaving the hair greasy. Focus on the lengths and ends to avoid the scalp becoming overly oily.
2. Myth: Shea Butter Weighs Down Hair
Fact: Shea butter is a lightweight natural emollient that smooths the hair cuticle without weighing it down. It adds moisture and shine without compromising volume.
3. Myth: Shea Butter Is Only for Thick Hair
Fact: Shea butter is beneficial for all hair types, including fine or thin hair. Adjust the quantity based on your hair’s thickness, and focus on applying to the ends and drier areas.
As you embark on the journey to discover the secrets of shea butter for your hair, remember that the regal transformation of your locks begins with simple, natural ingredients. The luxurious texture and nourishing properties of shea butter have stood the test of time, offering a timeless solution for those seeking a crown of healthy, radiant hair. Through these DIY treatments and tips, you can elevate your hair care routine, infusing it with the richness of shea butter and embracing the true regality of your crowning glory. Let the shea butter secrets unfold, and revel in the transformative power it brings to your cherished tresses.

